Edible Gold A 18K Ornament
The use of gold as food for sacred purposes came from the East about 5,000 years ago. Used for religious purposes in China and Japan, and several testimonies prove that it was widely used as a food to express gratitude to the gods in the time of the ancient Egyptians.
After
losing its traces for a few centuries, we find it again, for purely decorative
purposes, in Renaissance Europe of the 15th century, widespread during gallas
organized by Lords and in palaces of the era. It was so widespread that it
forced the Municipal Council of the city of Padua in 1500 to impose restrictive
measures on its use.
Because gold is a noble metal, it does not react with the human body. It is safe to ingest because it is not absorbed during the digestion process. Its ingestion, on the other hand, has no nutritional or health benefits. Nowadays, edible gold is used in high gastronomy and pastry but also for the decoration of drinks, liqueurs and cocktails. Gives a special note of radiance and luxury. Its difference from the simple gold leaves is in its composition since it contains exclusively gold and silver while during its production process all hygienic measures are taken so that it is suitable for eating. Its taste is neutral while it has no side effects for the human body since you do not absorb it. It is available in 4 forms: powder, flakes, thick flakes and leaves.
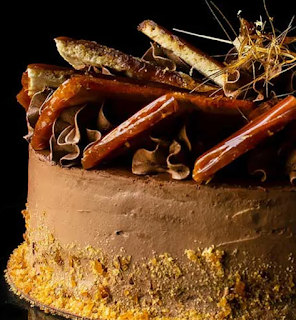
Dobos Torte, Hungarian origin cake
FOR
DOBOS SPONGE CAKE:
6 large
eggs
75 g sugar
75 g icing
sugar
150 g
pastry/cake flour
40 g
unsalted butter, melted and cooled
1 tsp
vanilla extract
pinch of
salt
FOR THE
SYRUP:
115 g water
115 g sugar
a shot of
Bourbon
FOR MOKA
SMBC:
155 g egg
whites
285 g sugar
375 g
unsalted butter at room temperature
200 g 70%
black chocolate, melted and cooled
few drops
of coffee aroma
FOR
CARAMEL
170 g sugar
40 g
glucose or inverted sugar
a dash of
fresh lemon juice
30 g
unsalted butter at room temperature
Instructions
Make
Dobos sponge cake.
Preheat
oven to 410ºF/210ºC.
Draw
circles 8 inch/20 cm in diameter on baking paper. We will be able to draw 2 for
each sheet, but to bake them we will have to do it of 1 in 1 unless your trays
are very wide.
Sift the
flour, set aside.
In the bowl
of the KitchenAid or a stand mixer, add the eggs along with the sugar and salt.
Beat, increasing progressively the speed without reaching the maximum, until
reaching the rippon stage* (see in NOTES).
Add vanilla
and mix again for a few seconds.
Incorporate
dry ingredients, little by little, with enveloping movements helping us with a
spatula.
Finally,
add the melted butter and integrate again with enveloping and soft movements.
Place the
mixture in a piping bag.
Bake.
To prevent
the ends of the paper from lifting or moving when you pipe the batter, place a
few small "points" of batter in the corners. In this way the paper
will remain fixed.
Remember to
place the paper with the painted area facing down.
Cut the tip
of the piping bag and pipe the batter. Make a rectangle and then fill the
inside trying to exert the same pressure all the time. We will make a circle
following the pattern we have drawn. Then fill the interior trying to exert the
same pressure at all times.
If we have
any holes left, we can use a spatula to smooth the surface.
In total we
need to make 7 discs. In my case I got 8, will depend on the pressure you exert
when squaring the dough.
Place in
the oven for 5-6 minutes. We will see that it acquires a light golden color for
the surface.
Remove from
the oven and let it cool completely on a rack.
Repeat the
process with the rest of the cake discs.
If we are
going to use them the next day, once it is completely cold, cover it with film
and leave it at room temperature.
Make the
syrup.
Pour the
water with the sugar in a saucepan.
Place at medium heat and let it boil. The sugar should be completely dissolved.
Once it
comes to the boil, turn off the heat and let it cool completely.
Place the
syrup in a bottle with the help of a funnel, add Bourbon to taste, close and
shake to mix well.
Set aside
at room temperature.
Make
Moka Swiss Meringue Buttercream.
Melt the
black chocolate in a water-bath. Set aside.
In a
heat-resistant bowl, add the egg whites along with the sugar.
Place on a
water-bath at medium low heat. Stirring constantly, leave until the egg whites
reach 165ºF/74ºC. For it we will help ourselves of a digital thermometer.
Remove from
the heat, pour the egg whites into the bowl of the KitchenAid or a stand mixer
and whip at medium high speed until a firm and shiny meringue is obtained.
Once we
have the firm meringue, begin to add the butter cut into squares little by
little and at the same time the mixer continues whipping.
Once we
have all the butter added, increase the speed and finish whipping.
Stop, scrap
the cream with the help of a spatula.
Turn the
kneader back on, speed 1, and add the chocolate in a fine continuous thread
along with the coffee essence. Taste and rectify until the desired flavor is
achieved.
Whip again
at high speed until the ingredients are fully integrated.
Fill.
To give a
round finish to the sponge cakes, since piping will not have that luck, place a
plate on the cake and cut the edges.
Reserve one
of the discs for the final decoration. Wrap it in film to prevent it from
drying out.
Place a
disc to serve the cake on a rotating cake stand. Under the disc place a piece
of anti-slip so that it does not move.
Put a small
amount of SMBC and place the first disc.
Soak with
syrup, be generous.
Put 2
tablespoons of SMBC and spread with the help of a spatula. We will try to leave
it as smooth as possible.
Place
another disc of sponge cake and press lightly. Repeat the same process as the
previous time. Soak in syrup and spread a layer of SMBC.
We make
this same step with all the layers. Remember to reserve a sponge disc!
Spread the
SMBC with a spatula over the entire surface and remove the excess with the help
of an edge smoother. This layer will help us to "pick up" possible
crumbs from the cake that could come to the surface when we decorate it.
Refrigerate
for 30 minutes for the SMBC to harden.
Remove from
the cold, place another layer of SBMC all over the surface, smooth out the
excess and cool for 60 minutes.
At this
point, we can leave it refrigerated until the next day. In my case that's what
I did.
Cover the
rest of SMBC with film and leave it at room temperature in winter, not summer.
Make the
caramel.
Put the
sponge cake we had reserved on a silpat or teflon sheet. Set aside.
In a medium
saucepan or a large saucepan, add the sugar together with the glucose or invert
sugar and the lemon juice.
Place at
medium-low heat and let it begin to melt. Once it begins to caramelize, stir
often to prevent some areas from burning. Reduce the heat a little if
necessary.
Once we
have a golden caramel, add the butter and stir well until completely dissolved.
Remove from
the heat and poured on the cake. Spread with the help of a spatula to cover the
entire surface and prevent the top layer is too thick.
With the help
of a sharp and long knife, well spread in butter, make the cuts. In total we
will have to obtain 12 triangles. You will probably have to butter the knife
more than once. Leave a bowl nearby with a little quantity to be able to work
fast, otherwise the caramel will begin to harden and will be very difficult to
cut.
Let it cool
completely.
Finish
decorating the cake.
Take the
cake out of the fridge. With the help of a spatula, cut the superior surplus of
SMBC.
Spread a
small amount of SMBC over the top and smooth. This will give a smooth and
beautiful finish to the top.
Introduce
the SMBC in a piping bag with a Wilton 1M tip (or the one you prefer).
With the
help of a knife, draw the cuts on the top of the cake. In total we will make 12
triangles. This makes it much easier to decorate the cake.
Pipe a pile
of SMBC in each triangle, the ideal is to pipe it in the right side of the
triangle.
With the
help of a knife, finish separating the caramel triangles and remove the
surplus, cutting it, that they can have.
Place in
the upper part of the cake, having as pattern the marks that we have made
previously. The final aspect will be very similar to a pinwheel.
Pipe a
small amount of SMBC in the center, decorate with caramel threads and edible
gold leaf.
In a
mortar, put caramel leftovers and crush it.
Decorate
the sides with this caramel powder.
The ideal
is to consume the cake at room temperature, the cream will have better texture.
Otherwise, refrigerate until we need it. But remember to temper it about 5-6
hours before consuming it if it is winter.
Recipe Source
and more tips: bake street


Comments
Post a Comment